Saturday, March 26, 2011

Rain Rain Go Away....But if you won't I'll bake some bread!

Sigh... after getting my whole article written, I clicked a wrong button and lost it all, so here is my second try.

Spring came and then it left again LOL, From what I understand my neighbors to the north are even getting snow! I am SO DONE with the snow this year! My daughter Ashley, is suffering temperatures in the low 30's at Navy boot camp in Great Lakes so I can't complain. We're just getting rain and temps back into the 50's. The good thing is, my peas and beets are getting plenty of water!  Days like this aren't always a bad thing. The past month or so has been pretty hectic with Ashley leaving for boot camp, my dad being sick and then learning Mike has to be tested for prostate cancer. I am keeping my chin up and being as strong as possible for everyone, but sometimes a girl just needs a day where she can bake some bread, write a few letters and gather her wits about her. Today is that day.

I haven't been to the grocery store for days so I rummaged through the cabinets to see what I had on hand to bake bread with. I had plenty of whole wheat flour and some honey so Honey Wheat bread was the winner.  I found this recipe on AllRecipes.com and it is by far, one of the BEST breads I have ever made. The dough is super easy to work with and before you know it you have a couple loaves of delicious bread, not to mention a house that smells heavenly.  Here's the recipe.

Honey Wheat Bread

Ingredients

  • 3 cups warm water (110 degrees F/45 degrees C)
  • 2 (.25 ounce) packages active dry yeast
  • 1/3 cup honey
  • 5 cups bread flour
  • 3 tablespoons butter, melted
  • 1/3 cup honey
  • 1 tablespoon salt
  • 3 1/2 cups whole wheat flour
  • 2 tablespoons butter, melted


Directions

  1. In a large bowl, mix warm water, yeast, and 1/3 cup honey. Add 5 cups white bread flour, and stir to combine. Let set for 30 minutes, or until big and bubbly.
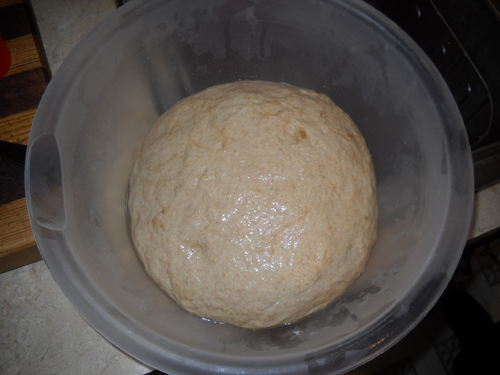
  2. Mix in 3 tablespoons melted butter, 1/3 cup honey, and salt. Stir in 2 cups whole wheat flour. Flour a flat surface and knead with whole wheat flour until not real sticky - just pulling away from the counter, but still sticky to touch. This may take an additional 2 to 4 cups of whole wheat flour. Place in a greased bowl, turning once to coat the surface of the dough. Cover with a dishtowel. Let rise in a warm place until doubled.
  3. Punch down, and divide into 3 loaves. Place in greased 9 x 5 inch loaf pans, and allow to rise until dough has topped the pans by one inch.
  4. Bake at 350 degrees F (175 degrees C) for 25 to 30 minutes; do not overbake. Lightly brush the tops of loaves with 2 tablespoons melted butter or margarine when done to prevent crust from getting hard. Cool completely 

And that's my rainy day bread recipe :)  Stay tuned for a Country Living Giveaway! If you love magazines you'll love the next giveaway. Someone will win a free subscription to Country Woman Magazine! 


Wednesday, March 23, 2011

Country Living 101 :: 30 Acres and a Mule

Well, sort of....maybe not 30 acres and a mule, but how about an acre and a Saint Bernard? Hehehe...

Our property sits on 30 acres, we own 3 acres and are preparing to buy the other 27 from the folks who originally sold us our home back in 2003. At the time, we couldn't afford the additional cost for the land but Darrell and Sharon, the couple we bought the house from agreed to let us have the first shot at it when the time came. They moved to South Carolina but come back at least once a month to maintain the rest of the property.

It's been our dream since we moved here to own all 30 acres and each day we move closer and closer to realizing that. Since our neighbors are rarely ever here, they basically let us do whatever we want as they know we're going to buy the rest, it's only a matter of time.

This year business is so slow it's practically at a stand still, I've basically become a traditional housewife. This is not a bad thing and I'm actually enjoying it. I never realized how peaceful the house is during the day when all the kids are at school and Mike is at work. It's just me, the animals, and the sounds of all of this country nature...pure bliss.  My husband is simply the greatest man alive. He lets me spend my days doing whatever I want and has pretty much given me the go ahead to take my little homesteading project a little further than I had intended. He's something else I tell ya. I married a prince.

Now that the weather has warmed up, (we're enjoying temps in the 70's much of the time) I've had time to go outside and really take a look at our property and the property that surrounds us. Our house is partially built into English Mountain and much of the land is wooded, but there is plenty cleared that I can work with so long as I leave the front yard, which is about 2 acres, alone and looking nice Mike is pretty much letting me decide what I want to do. The problem is, I'm not sure what I want to do. The downstairs of our home is completely finished with a second full kitchen, but now that Ashley is in the Navy, it's just Cassie and her cat down there. It could actually be another 1500 sq. foot home with 2 bedrooms, 2 bathrooms, the kitchen, a fireplace,  and tons of open space. As of now, it;s just there, unused and unloved. I need ideas to put this space to work!

I'm a newbie to the homesteading movement, but I've got the bug bad! I know I need to be doing something so I figured I'd reach out to all of my homesteading, gardening, country living, and just plain creative buddies to see what you suggest.  Whatever projects I choose to undertake, I'm going to produce an eTV segment for Under the Willow Tree eTV (or more) and I'd love to feature some ideas from my fellow homesteaders.

Some of my ideas include:

- Raising dairy goats
- Making artisan cheese
- Bee keeping

So tell me... what would you do with an acre of good land and 1500 extra sq. feet of house?  Anybody? Anybody? (says this in the best Ferris Beuller voice)

Monday, March 21, 2011

Gardening :: Spring Planting

Oh how I LOVE the spring! Winter started early last year and last almost 4 whole months which is a long time here in east Tennessee. Normally, we're still in sweatshirts in late December with January and February being true winter months. Not this past year. It started snowing in November and it feels like it never stopped! East Tennessee was incapacitated at least half a dozen times from the snow storms that pummeled us one right after the other. With temperatures now in the mid to high 70's it's no wonder everyone is outside playing in the dirt, myself included!

A few weeks ago, all of my friends and I were talking about which veggies could be planted first and depending on where you live, quite a few of us were starting early and planting spring crops we'd never planted before.  My wonderful neighbor came with his tractor and disc and plowed and disced the garden for us so the soil would be good and fine come planting time and finally, planting time came!

Up until I moved to the beautiful foothills of the Smoky Mountains in Tennessee I had what most people would consider a black thumb, I mean, I could kill silk plants given the opportunity. I never had to worry about anyone asking me to care for their plants when they went away because everyone basically knew that if I looked at the plant it was a gonner. My husband wouldn't even let me touch the seeds of our first 3 gardens (I kid you not) because everything I touched either didn't grow or died shortly after. I felt like I was cursed in the garden so I set out to learn as much as I could about gardening, planting, and the like.  Now, I'm no horticulturist, but I've learned a few things about gardening that have yielded some pretty good harvests as the years have gone by. My husband even let me plant the peas ALL ALONE this year! Ha!  I can't truly live a country life if I'm dangerous in the garden.

This year, I'm going to show him a thing or two. I got my first batch of veggies planted. I've got peas, beets, and cabbage in the ground! Oh Yea! I've got red onions and basil started in pots and I just started my first batch of Beefsteak tomatoes inside too! I'll start the Roma's in a few days. No Italian household is complete without home grown Roma tomatoes for canning and fresh basil. I can practically smell the fresh sauce already!!

I never realized what I was missing out on when it came to gardening and growing and the joys and benefits of doing it. I've become  obsessed with planting and I spend more time researching what I can grow and how to grow it than I ever have before. I am LOVING this new hobby!

If you're just setting out on your country living adventure let me tell you that this is one of the true pleasures of country living. You can enjoy it too and it doesn't matter where you live. With so many folks living in urban areas there are more and more people planting gardens on their apartment balcony's and in container gardens. Where there is a will and a desire, there is a way! Just Google "Container Gardens" and get ready for a TOn of information!

If this is your first time with spring planting I'd go with peas, beets (if you like 'em), cabbage, or even carrots.  Peas are one of the, if not the best plant to plant in the spring. Peas thrive in cool, moist, climates and early plantings will produce greater yields than plantings later in the season.

You'll want to make sure that you're soil is about 45 degrees. Peas can tolerate a mild frost, but you should wait until all dangers of a deep freeze are past. Your soil should be moist to the touch and you'll want to plant seeds about 1 inch deep and one to three inches apart with rows spaced about 18 inches apart. Depending on the kind of peas your growing, you may need a trellis if your growing tall varieties.

Some more spring veggies are:
Beets
Cabbage
Lettuce
Spinach
Carrots
Broccoli
and a few more (See the chart below)

Here is a handy dandy chart I found on Heirloom Seeds (Heirlooms seeds are the best!)


VARIETY 

MARCH 20

MARCH 30

APRIL 10

APRIL 20

APRIL 30

  MAY 10 

 May 20

BEAN,
LIMA

 APRIL 1 

  APRIL 15 

APRIL 20

MAY 1

MAY 10

MAY 20 

JUNE 1

BEAN, 
SNAP

MARCH 25

APRIL 10

APRIL 15

APRIL 25

MAY 5

MAY 15

MAY 25

BEET

FEB. 15

MARCH 1

MARCH 10

MARCH 20

APRIL 1

APRIL 15

APRIL 25

BROCCOLI,
PLANTS

FEB. 15

MARCH 1

MARCH 10

MARCH 20

APRIL 1

APRIL 15

APRIL 25

CABBAGE,
PLANTS

FEB. 15

MARCH 1

MARCH 10

MARCH 20

APRIL 1

APRIL 15

APRIL 25

CARROT

FEB. 15

MARCH 1

MARCH 10

MARCH 20

APRIL 1

APRIL 15

APRIL 25

CHARD

FEB. 20

MARCH 1

MARCH 15 

APRIL 1

APRIL 15

APRIL 20

APRIL 30

COLLARD,
PLANTS

FEB. 15

MARCH 1

MARCH 10

MARCH 15

APRIL 1

APRIL 15

APRIL 25

CORN, 
SWEET

MARCH 30

APRIL 10

APRIL 20

MAY 1

MAY 10

MAY 20

MAY 30

CUCUMBER

APRIL 1

APRIL 10

APRIL 20

MAY 1

MAY 10

MAY 20

MAY 30

EGGPLANT,
PLANTS

APRIL 1

APRIL 10

APRIL 20

MAY 1

MAY 10

MAY 20

MAY 30


If you've already started your spring planting, I'd love to hear what you've got growing! Feel free to send pictures too! I'll include them on our Facebook Page and if you haven't already done so, join our community! It's free and you can share your gardening adventures with the rest of us..videos are welcome too!

Click here to join the Under the Willow Tree Members community.

Sunday, March 20, 2011

Country Living 101 :: Surviving a Disaster Series - Part I

The events that have enveloped Japan over the past week have inspired me to kick things up a notch. My heart goes out to the Japanese people. I can't even begin to imagine what it would be like to live through an earthquake, a tsunami, and the threat of a nuclear meltdown all in one week.


Having been raised in Buffalo, NY and having lived in Florida for 23 years the closest I've come to disaster is The Blizzard of '77 and Hurricane Andrew along with a few minor hurricanes in between. I can remember losing power, but we never went without food and water and our house stayed intact. Yea, it was uncomfortable but my mom was pretty good when it came to making things work. During the blizzard she cooked in the fireplace and on a portable propane stove and the hurricanes left us without air conditioning, but we had it pretty easy. It's laughable that people were complaining about having to suffer the heat without their A/C while the power company worked to restore service.  I just can't imagine having everything we own, pets, pictures, furniture, and in many cases in the tsunami effected area, family members washed away in a matter of minutes.  I can't imagine not having a home to go to where I can lay down and sleep or go to the refrigerator and get a cold drink or microwave a quick snack.  None of the people I know can imagine it either. Most of the people I know have what's called "Normalcy Bias". It's when you are convinced that nothing like that could ever happen to you or that the U.S. government would be there to rescue you in the event of disaster striking. Oh people...it's time to wake up.  I'm not trying to panic anyone, but the reality of the times we live in should be enough to convince you that you need to be prepared.


One need only look back to the situation that people in New Orleans were left in Post Katrina to realize that the only one you are going to be able to depend on in a disaster is yourself and your family. One of the good things I love about country living is the lessons I've learned about using anything and everything you have for something. Old clothing can be turned into rag quilts, leftovers can be preserved and stored, what we eat, how we prepare it and how we preserve it are all part of a country living mindset. Urban homesteaders have made being self-sufficient an art-form and are raising their own small livestock in their city backyards, they're growing their own food, and learning to live as "off-grid" as possible. If you live in the city near someone who is urban homesteading, my advice would be to befriend them and learn as much as you can. You won't be sorry.  In my opinion, the urban homesteading movement couldn't have kicked into high gear at a better time than now.


Until recently, I never really paid much attention to things like this. I had "Normalcy Bias" and believed that nothing as catastrophic as what happened in Japan or even New Orleans would ever touch my world. I believe that is the wrong attitude to have these days. Here's the way I see it. Our government has proven time and again that they are unreliable, not trustworthy, and lately not working in the best interest of the people. I didn't come to these realizations easily and actually used to mock  people who used to believe these same things. Over the past several months it seems as if lots of people who used to be just like me are starting to feel the same way. It's like some of us can just feel the change coming and people who never thought about growing their own food or raising chickens or bees are starting to teach themselves these things and more about being self sufficient. We're not panicking, but we know something isn't right and we need to be prepared. 


There are a gazillion resources online for disaster preparedness, but I thought I'd just cover a few basics. I'd love to hear from any of you who are prepared and will share your ideas with the rest of my readers. I don't think we can ever be OVER prepared and since we all live in different areas and setting, hearing different ideas is a good thing. 


Disaster Planning:


1.)  Have a Plan! - The most important part of a family disaster plan is the plan itself.  You'll want to make sure that the whole family is familiar with the plan especially if there's a good chance that family members won't all be home or in the same location if/when disaster should strike. For instance, if you and your spouse work and you have kids in school, have a plan in place on where everyone should meet and a backup location if something should happen to your first location. Not knowing where your loved ones are during a catastrophic event is scary for you and for them.  You might want to take the time to prepare a written booklet and make sure everyone knows where it is. You can use the booklet to document important details of your plan. 


If you're responsible for extended family like elderly parents, etc. you'll want to make sure that if they are capable, they are familiar with the plan as well. Leave instructions with any medical or retirement facilities of what you wish to be done with your family member in the event of an emergency.  Since communication is one of the first things lost in a disaster, make sure your plan has been clearly and effectively communicated with all members of your family and touch base every so often to refresh everyones memory. 


Don't forget your pets. Our furry family members depend on us for their very survival and comfort. They lack the ability to understand any plans or preparations and in the event of a disaster they'll need you all the more. Make sure your disaster plan includes plans for your pets.  Nothing is more heartbreaking than seeing the images of Katrina and other natural disasters where pets roamed the streets starving, in search of food and shelter. Don't let that be your pet.


To some people it may seem extreme, but you'll be glad you took the time to prepare should disaster strike. 


2.) Prepare a Disaster Kit - It's a good idea to have 2 disaster kits. One for home and one for the car in the event that you are not home if disaster strikes and especially if you live in an area where the weather gets super cold. 


At home, be sure to keep all of your important papers like passports, birth certificates, social security cards, etc. all in one place. This ensures that in the event that you need them, you can grab them all at once with your bag and go instead of wasting time to search for them. 


Fema recommends the following Items for your home disaster kit:

  • Three-day supply of non-perishable food.
  • Three-day supply of water - one gallon of water per person, per day.
  • Portable, battery-powered radio or television and extra batteries.
  • Flashlight and extra batteries.
  • First aid kit and manual.
  • Sanitation and hygiene items (moist towelettes and toilet paper).
  • Matches and waterproof container.
  • Whistle.
  • Extra clothing.
  • Kitchen accessories and cooking utensils, including a can opener.
  • Photocopies of credit and identification cards.
  • Cash and coins.
  • Special needs items, such as prescription medications, eye glasses, contact lens solutions, and hearing aid batteries.
  • Items for infants, such as formula, diapers, bottles, and pacifiers.
  • Other items to meet your unique family needs.


If you live in a cold climate, you must think about warmth. It is possible that you will not have heat. Think about your clothing and bedding supplies. Be sure to include one complete change of clothing and shoes per person, including:
  • Jacket or coat.
  • Long pants.
  • Long sleeve shirt.
  • Sturdy shoes.
  • Hat, mittens, and scarf.
  • Sleeping bag or warm blanket (per person).
Just as important as putting your supplies together is maintaining them so they are safe to use when needed. Here are some tips to keep your supplies ready and in good condition:
  • Keep canned foods in a dry place where the temperature is cool.
  • Store boxed food in tightly closed plastic or metal containers to protect from pests and to extend its shelf life.
  • Throw out any canned good that becomes swollen, dented, or corroded.
  • Use foods before they go bad, and replace them with fresh supplies.
  • Place new items at the back of the storage area and older ones in the front.
  • Change stored food and water supplies every six months. Be sure to write the date you store it on all containers.
  • Re-think your needs every year and update your kit as your family needs change.
Keep items in airtight plastic bags and put your entire disaster supplies kit in one or two easy-to-carry containers, such as an unused trashcan, camping backpack, or duffel bag.

Some pet care items to include: 
  • proper identification / immunization records / medications
  • ample supply of food and water
  • a carrier or cage
  • muzzle and leash
Car Disaster kit:

In case you are strand­ed, keep a kit of emer­gency supplies in your car.
This kit should contain food, water, first aid supplies, flares, jumper cables, and seasonal supplies.

You can learn more about FEMA's recommendations  by clicking here.


So ends the first part of our Disaster Series. I hope this information is helpful to you. I don't want you to panic, but I want you to overcome any "Normalcy Boas" you might be dealing with and just be prepared. 

In our next issue, we'll be talking about how to deal with disaster when you live in an urban area, what to do during the disaster and after and some survival tips. 

Be sure to send me any of your disaster planning tips, I'll include them in our series!