Spring has sprung in east Tennessee and about a month early. It was kind of weird to be plowing the garden in late February, but I'm not complaining. It seems like everyone I talk to was ready to get their hands dirty and start planting. Who could blame us? The prices for food have continuously gone up while the quality continues to deteriorate. I can't tell you how tired I am of spending good money on crap produce and processed food. The good thing is, people are catching on and the movement to grow, bake, and make your own is gaining momentum!
We have some newcomers to the ole' ranch - 5 Peking ducklings. They are simply adorable! Since I love to bake and they say duck eggs are THE BEST eggs to bake with, I'll be looking forward to trying them this summer. The little sweeties outgrew the indoor hutch in 2-weeks so Mike had to get busy building their permanent abode. we had a bunch of leftover materials from the dog house and chicken coop and an old building we took down, so the hutch is built from 98% recycled materials. In the process of building the hutch, he decided to add a small duck pond instead of using a plastic pool. The new house is done except for painting and flower boxes he promised to add for me, but the pond is still in the process.
I'll post pictures when it's all done, but in the meantime here is a picture of the little darlings in their temporary run. We'll keep them penned until they get bigger to protect them.
The chickens don't seem to mind the new additions, and they've all gotten along swimmingly (no pun intended). They eat together and hang out together and other than a few curious stares, we've had no problem integrating the ducks with the chickens.
Speaking of chickens! It's only March and we're already getting on average, eleven eggs a day from the lovely ladies. They barely slowed down during the winter months. We've been a bit more careful about leaving them out all day after the coyote incident a few months ago, but they get out and stretch their little legs at least once every other day. Keeping them out of the strawberry patch is always fun. We'll have to fence the garden this year to make sure they don't destroy the plants.
The garden is off to a GREAT start! I've got 28 San Marzano tomato plants started, 10 heads of cabbage, 8 basil plants, and beets all ready to go! I'll add beefsteak tomatoes and of course the yellow ones Mike loves so much. I can't WAIT for fried green tomatoes! Louie and I LOVE a good summer snack of fried green tomatoes with Ranch dressing. It's definitely a summertime favorite. I've got a list of other stuff but this is what I'm starting with. The most important thing is having plenty of tomatoes to can for the winter. I'll be adding corn, cukes (for pickles), pumpkins, melons, banana peppers, and anything else I can convince Mike to let me grow!
Although the economy is still a mess and many people are limited in what they can do, I've discovered all kinds of wonderful things by simply not worrying about things you can't change and focusing on how to make the best of what I have. Honestly? I've realized how much I've taken for granted all these years and how much we really do have. I'm loving the country life more than ever and look forward to the adventures this lifestyle brings every day!
One of the first things I tried to row when we moved to the country 8 years ago was cucumbers. Little did I know, six cucumber plants would yield enough cukes to feed a small army and since I was totally ignorant to any type of preservation methods at the time, I gave what I wasn't able to use in my restaurant away. Needless to say, I gave away BAGS and BAGS of cucumbers and learned that 3 plants would provide enough cucumbers for just about anyone.
Fast forward a couple of years, I met a wonderful woman who would become my best friend, Charlene J...a.k.a. Charney. Here I was, this New York, Italian gal transplanted to the country and about as green as they come. Charney took me under her wing and started teaching me all things country. I taught her a few Italian tips and tricks and she made sure that I'd fit in here in our small country town. I don't get to spend as much time with Charney these days, but she is still my most precious friend and I try to expand on the things she taught me over the years. The most important being how to can fresh tomatoes. How can ANYONE who has ancestors who come from Italy, ever make sauce without fresh canned tomatoes? I will forever be gratful to Charney for that lesson and for inspiring me to expand on my canning talents.
So, fast forward again to Garden 2011. I planted 4 cucumber plants, the kinds used for pickling and while the plants took over the "vining plants" section of the garden, I set out to find a scrumptious sweet pickle recipe for my husband. He likes sweet pickles. So today I'm going to share my first Sweet Pickle Canning experience with you. Here we go...
Quick Sweet Pickles
May be canned as either strips or slices. 8 lbs of 3- to 4-inch pickling cucumbers
1/3 cup canning or pickling salt
4-1/2 cups sugar
3-1/2 cups vinegar (5%)
2 tsp celery seed
1 tbsp whole allspice
2 tbsp mustard seed
1 cup pickling lime (optional - for use in variation
below for making firmer pickles) YIELD: About 7 to 9 pints PROCEDURE: Wash cucumbers. Cut 1/16 inch off blossom
end and discard, but leave 1/4 inch of stem attached.
Slice or cut in strips, if desired. Place n bowl and
sprinkle with cup salt. Cover with 2 inches of crushed
or cubed ice. Refrigerate 3 to 4 hours. Add more ice as
needed. Drain well. Combine sugar, vinegar, celery seed, allspice, and
mustard seed in 6-quart kettle. Heat to boiling. Hot pack -- Add cucumbers and heat slowly until vinegar
solution returns to boil. Stir occasionally to make sure
mixture heats evenly. Fill sterile jars, leaving 1/2-
inch headspace. Raw pack -- Fill jars, leaving 1/2-inch headspace. Add
hot pickling syrup, leaving 1/2-inch headspace. Adjust
lids and process as below or use the low temperature
pasteurization treatment described on page 5. Variation for firmer pickles. Wash cucumbers. Cut 1/6-
inch off blossom end and discard, but leave 1/4-inch of
stem attached. Slice of strip cucumbers. Mix 1 cup
pickling lime and 1/2 cup salt to 1 gallon water in a 2-
to 3-gallon crock or enamelware container. CAUTION:
Avoid inhaling lime dust while mixing the lime-water
solution. Soak cucumber slices or strips in lime water
solution for 12 to 24 hours, stirring occasionally.
Remove from lime solution and rinse and resoak 1 hour in
fresh cold water. Repeat the rinsing and resoaking two
more times. Handle carefully because slices or strips
will be brittle. Drain well. Recommended process time for QUICK SWEET PICKLES
in a boiling-water canner
                     Process Time at Altitudes of

Style      Jar       0-          1,001-       Above

of Pack    Size      1,000 ft    6,000 ft     6,000 ft

Hot        Pints or  5 min       10           15

           Quarts

Raw        Pints     10 min      15           20

           Quarts    15          20           25
STORAGE: After processing and cooling, jars should be
stored 4 to 5 weeks to develop ideal flavor. VARIATION: Add 2 slices of raw whole onion to each jar
before filling with cucumbers.
What a FANTASTIC 20 days we had with Ashley! She's off to Japan now and we got a call last night letting us know she arrived safely and so far, she LOVES it! Wow! What an adventure she is having and I just can't wait until we've saved enough to go and visit, We're hoping for next spring or early summer...so I get to look forward to an adventure of my own too! What's going to make it even more exciting is the fact that ALL of us are going! Louie is just beside himself with excitement! He's already announced on his Facebook wall that a trip to Japan is coming up!
The Washam Men - Louie, Kyler, Uncle Pat & Mike
Fourth of July weekend was extra, super, special this year. Not only was our Sailor home for the holiday, Mike's brother and his family came too! It's the first time we've had his family here and it was absolutely perfect. We had an AMAZING 4th of July complete with a massive BBQ buffet and our own fireworks display which was twice the size it normally is because Uncle Pat added 3 Holy Moley fireworks to the 2 Daisy Cutters we usually get and a box load of little stuff like roman candles, bottle rockets and all kinds of other stuff that explodes into delightful displays. The mountain was all lit up as others were doing the same thing we were. I have always said that our driveway is the best seat for watching fireworks, we see displays for miles around us and we don't have to deal with the traffic when it's over!
last night I went out to visit with the chickens, the girls are getting big and I'm pretty sure we got one rooster in the bunch, we can't tell yet, but it sounds like one of them is trying to crow. One rooster and 18 hens, he's going to be awfully busy! Bwahahahaha.... The coop is right next to the garden and I was delighted to see that my tomato plants have literally EXPLODED with tomatoes! I have no less than 500 Roma tomatoes growing with a thousand yellow flowers promising more! The cukes are PERFECT and so far I've got about 20 of which I'm going to pickle tomorrow into sweet pickles for Mike and the next batch I'll do dills. The corn is 4 feet high, the pumpkins are going wild and even after the wash out rain that took all my sunflowers I've got 4 mammoth sunflowers growing! Hey, it's better than none and I would have LOVED to see two full rows of those big beauties...there's always next year and I can still enjoy the 4 that survived! The watermelon plants are doing great and I got my beans, peppers, fennel, and Jalapenos and banana peppers planted. I love going out there and finding the veggies ready to pick and the strawberries are flowering again for a second crop... THESE are truly treasures! I love the fact that it's all grown right in my back yard with no chemicals or pesticides. For about $30 I have HUNDREDS of dollars worth of fresh produce.
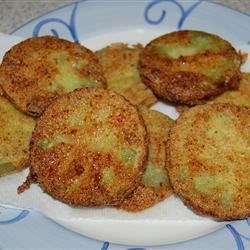
One of our favorite summer time foods is Fried Green Tomatoes. We had them for 4th of July and they disappeared along with the fried pickles. Both of these dishes are southern specialties and family favorites. Growing tomatoes provides us with an endless supply of green tomatoes and I'm planning to can a few jars of pickles just for frying... If you've never tried a fried pickle and you like pickles... YOU GOTTA TRY THEM!! They are SCRUMPTIOUS! I've included a recipe below for you. It's my own spin on the classic...I just modified mine a bit. You can use this same coating for the pickles, just get a jar of dill pickle slices (the ovals work best) and serve them with Ranch dressing. Mmmmmmmmmm
Fried Green Tomatoes
Ingredients
4 large green tomatoes
2 eggs
1/2 cup milk
1 cup all-purpose flour
1/2 cup cornmeal
1/2 cup bread crumbs
1 teaspoons salt
Dash garlic powder
Dash (or more to taste) of cyanne pepper (optional)
1/4 teaspoon ground black pepper
1 quart vegetable oil for frying
Directions
Slice tomatoes 1/2 inch thick. Discard the ends.
Whisk eggs and milk together in a medium-size bowl. Scoop flour onto a plate. Mix cornmeal, bread crumbs and salt and pepper on another plate. Dip tomatoes into flour to coat. Then dip the tomatoes into milk and egg mixture. Dredge in breadcrumbs to completely coat.
In a large skillet, pour vegetable oil (enough so that there is 1/2 inch of oil in the pan) and heat over a medium heat. Place tomatoes into the frying pan in batches of 4 or 5, depending on the size of your skillet. Do not crowd the tomatoes, they should not touch each other. When the tomatoes are browned, flip and fry them on the other side. Drain them on paper towels.
Hello all my wonderful fellow country living neighbors! It's been WAY too long since I've made a post and I sincerely apologize for my absence. It has been a crazy month with way too much going on, but things are settling down again so I am back to baking, blogging and enjoying my country life.
First, I want to tell you ALL about my daughter Ashley's AMAZING accomplishments! On May 6, 2011 she graduated from Navy boot camp and is now in Meridian, MS for A-school. She was just given her verbal orders for her first duty station...are you ready for this? She is going to Yokosuko, Japan! I can not even begin to tell you how proud we are. Out of all the negatives and struggles we've dealt with this past month, Ashley gave us something to be so proud of. Check out the video of her graduation! She was in a performing division and did an amazing job!
You know, the economy has left my business in tatters, and we've had some issues with our middle child, but just when I think I have failed miserably, something as wonderful as this happens. Seeing my daughter wearing the uniform of a United States Sailor for the first time was an experience I will never forget. Can you believe this magnificent creature is my daughter? I can't.
While away she was given standard military issue glasses, better known as BCG's or "Birth Control Glasses" because no one has ever been known to get "lucky" in them HAHAHA!! She said she looks like Erkle! I think she looks adorable! Check out her formal picture...
OK, so now that I've bragged about my amazing daughter and her amazing accomplishments, I'll move on to other things.
The last month has been pretty rough financially, but we're surviving it and actually, these tough times are just a good reason to become more self-sufficient because I do not believe that things are going to get better any time soon.
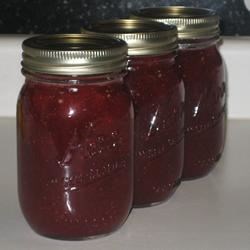
Last year I planted 35 strawberry pants and of course, the first year didn't yield any fruit. Well, all that changed this year! The plants spread to about 65 over the winter and early spring and the strawberries just exploded from everywhere! I had tons and tons of berries and for the first time ever, I made strawberry preserves! I preserved about 20 jars of the delectable fruit and gave some away to friends and family, but stored a bunch for winter. I compared it to the junk I was buying the the grocery store and not only was my jam made from organically grown berries with only natural sugar as a sweetener and some lemon juice to acidify the berries for preserving, it ended up being WAY cheaper. Not to mention, they are DELICIOUS!! This was my first time growing strawberries and I was pretty proud of myself and I impressed my hubby and family too!
The other thing I did to try and save some money was churn my own butter. Now I didn't sit with that wooden butter churn between my knees laboring away, actually, I found heavy cream on sale and used my Kitchen Aid. The butter was sweet and creamy and delicious and made the store bought butter taste like wax!! I'll never buy the store bought junk again! At least not if I don't have too! I also ended up with about 2 cups of fresh buttermilk which I used to make homemade banana bread. It was heavenly!
We ended up with 19 chickens, all brown laying hens after giving 10-away to a neighbor. Our coop wouldn't hold more than 19. The ladies are growing fast and almost ready to start laying! I am SO ready for those big, delicious brown eggs! I can't wait! AND, we were able to build the coop totally from recycled materials so it cost us practically nothing!
I keep hearing from our elected officials how the economy is getting better. Honestly, I can't see it. My grocery bill for 3 people each week is around $280 and that's without a lot of extras. My grocery bill when all the kids were home and there was 5 of us was about $300 per week, so I can't really see how this is getting better, add to that the fact that our government is trying to cut funding tot he FDA which is the same as killing us slowly if you ask me. It's enough of a reason for me to be totally committed to growing as much of my own food as possible and learning to make the things we call favorites. I've noticed that this isn't just a trend, it's becoming a movement and that's a good thing I think!
It doesn't really matter where you live, whether it be in the country or in the city or even in the suburbs, you can still produce some of your own food. My focus this summer is going to be on sharing how we're doing more, in a healthier way, with less. So, stay tuned, I promise I won't stay away so long next time.
In the meantime, here is the strawberry preserve recipe I used!
Soft Spread Strawberry Preserves
(I doubled this recipe and made multiple batches)
Ingredients
2 pounds fresh strawberries, hulled
4 cups white sugar
1/4 cup lemon juice
Directions
In a wide bowl, crush strawberries in batches until you have 4 cups of mashed berry. In a heavy bottomed saucepan, mix together the strawberries, sugar, and lemon juice. Stir over low heat until the sugar is dissolved. Increase heat to high, and bring the mixture to a full rolling boil. Boil, stirring often, until the mixture reaches 220 degrees F (105 degrees C). Transfer to hot sterile jars, leaving 1/4 to 1/2 inch headspace, and seal. Process in a water bath. If the jam is going to be eaten right away, don't bother with processing, and just refrigerate.
To test for jelling
Place three plates in a freezer... after about 10 minutes of boiling place a tsp of the liquid of the jam onto the cold plate. Return to freezer for a minute. Run your finger through the jam on the plate... if it doesn't try to run back together (if you can make a line through it with your finger) it's ready to be canned!
Well, sort of....maybe not 30 acres and a mule, but how about an acre and a Saint Bernard? Hehehe...
Our property sits on 30 acres, we own 3 acres and are preparing to buy the other 27 from the folks who originally sold us our home back in 2003. At the time, we couldn't afford the additional cost for the land but Darrell and Sharon, the couple we bought the house from agreed to let us have the first shot at it when the time came. They moved to South Carolina but come back at least once a month to maintain the rest of the property.
It's been our dream since we moved here to own all 30 acres and each day we move closer and closer to realizing that. Since our neighbors are rarely ever here, they basically let us do whatever we want as they know we're going to buy the rest, it's only a matter of time.
This year business is so slow it's practically at a stand still, I've basically become a traditional housewife. This is not a bad thing and I'm actually enjoying it. I never realized how peaceful the house is during the day when all the kids are at school and Mike is at work. It's just me, the animals, and the sounds of all of this country nature...pure bliss. My husband is simply the greatest man alive. He lets me spend my days doing whatever I want and has pretty much given me the go ahead to take my little homesteading project a little further than I had intended. He's something else I tell ya. I married a prince.
Now that the weather has warmed up, (we're enjoying temps in the 70's much of the time) I've had time to go outside and really take a look at our property and the property that surrounds us. Our house is partially built into English Mountain and much of the land is wooded, but there is plenty cleared that I can work with so long as I leave the front yard, which is about 2 acres, alone and looking nice Mike is pretty much letting me decide what I want to do. The problem is, I'm not sure what I want to do. The downstairs of our home is completely finished with a second full kitchen, but now that Ashley is in the Navy, it's just Cassie and her cat down there. It could actually be another 1500 sq. foot home with 2 bedrooms, 2 bathrooms, the kitchen, a fireplace, and tons of open space. As of now, it;s just there, unused and unloved. I need ideas to put this space to work!
I'm a newbie to the homesteading movement, but I've got the bug bad! I know I need to be doing something so I figured I'd reach out to all of my homesteading, gardening, country living, and just plain creative buddies to see what you suggest. Whatever projects I choose to undertake, I'm going to produce an eTV segment for Under the Willow Tree eTV (or more) and I'd love to feature some ideas from my fellow homesteaders.
So tell me... what would you do with an acre of good land and 1500 extra sq. feet of house? Anybody? Anybody? (says this in the best Ferris Beuller voice)
Oh how I LOVE the spring! Winter started early last year and last almost 4 whole months which is a long time here in east Tennessee. Normally, we're still in sweatshirts in late December with January and February being true winter months. Not this past year. It started snowing in November and it feels like it never stopped! East Tennessee was incapacitated at least half a dozen times from the snow storms that pummeled us one right after the other. With temperatures now in the mid to high 70's it's no wonder everyone is outside playing in the dirt, myself included!
A few weeks ago, all of my friends and I were talking about which veggies could be planted first and depending on where you live, quite a few of us were starting early and planting spring crops we'd never planted before. My wonderful neighbor came with his tractor and disc and plowed and disced the garden for us so the soil would be good and fine come planting time and finally, planting time came!
Up until I moved to the beautiful foothills of the Smoky Mountains in Tennessee I had what most people would consider a black thumb, I mean, I could kill silk plants given the opportunity. I never had to worry about anyone asking me to care for their plants when they went away because everyone basically knew that if I looked at the plant it was a gonner. My husband wouldn't even let me touch the seeds of our first 3 gardens (I kid you not) because everything I touched either didn't grow or died shortly after. I felt like I was cursed in the garden so I set out to learn as much as I could about gardening, planting, and the like. Now, I'm no horticulturist, but I've learned a few things about gardening that have yielded some pretty good harvests as the years have gone by. My husband even let me plant the peas ALL ALONE this year! Ha! I can't truly live a country life if I'm dangerous in the garden.
This year, I'm going to show him a thing or two. I got my first batch of veggies planted. I've got peas, beets, and cabbage in the ground! Oh Yea! I've got red onions and basil started in pots and I just started my first batch of Beefsteak tomatoes inside too! I'll start the Roma's in a few days. No Italian household is complete without home grown Roma tomatoes for canning and fresh basil. I can practically smell the fresh sauce already!!
I never realized what I was missing out on when it came to gardening and growing and the joys and benefits of doing it. I've become obsessed with planting and I spend more time researching what I can grow and how to grow it than I ever have before. I am LOVING this new hobby!
If you're just setting out on your country living adventure let me tell you that this is one of the true pleasures of country living. You can enjoy it too and it doesn't matter where you live. With so many folks living in urban areas there are more and more people planting gardens on their apartment balcony's and in container gardens. Where there is a will and a desire, there is a way! Just Google "Container Gardens" and get ready for a TOn of information!
If this is your first time with spring planting I'd go with peas, beets (if you like 'em), cabbage, or even carrots. Peas are one of the, if not the best plant to plant in the spring. Peas thrive in cool, moist, climates and early plantings will produce greater yields than plantings later in the season.
You'll want to make sure that you're soil is about 45 degrees. Peas can tolerate a mild frost, but you should wait until all dangers of a deep freeze are past. Your soil should be moist to the touch and you'll want to plant seeds about 1 inch deep and one to three inches apart with rows spaced about 18 inches apart. Depending on the kind of peas your growing, you may need a trellis if your growing tall varieties.
Some more spring veggies are:
Beets
Cabbage
Lettuce
Spinach
Carrots
Broccoli
and a few more (See the chart below)
Here is a handy dandy chart I found on Heirloom Seeds (Heirlooms seeds are the best!)
VARIETY
MARCH 20
MARCH 30
APRIL 10
APRIL 20
APRIL 30
MAY 10
May 20
BEAN,
LIMA
APRIL 1
APRIL 15
APRIL 20
MAY 1
MAY 10
MAY 20
JUNE 1
BEAN,
SNAP
MARCH 25
APRIL 10
APRIL 15
APRIL 25
MAY 5
MAY 15
MAY 25
BEET
FEB. 15
MARCH 1
MARCH 10
MARCH 20
APRIL 1
APRIL 15
APRIL 25
BROCCOLI,
PLANTS
FEB. 15
MARCH 1
MARCH 10
MARCH 20
APRIL 1
APRIL 15
APRIL 25
CABBAGE,
PLANTS
FEB. 15
MARCH 1
MARCH 10
MARCH 20
APRIL 1
APRIL 15
APRIL 25
CARROT
FEB. 15
MARCH 1
MARCH 10
MARCH 20
APRIL 1
APRIL 15
APRIL 25
CHARD
FEB. 20
MARCH 1
MARCH 15
APRIL 1
APRIL 15
APRIL 20
APRIL 30
COLLARD,
PLANTS
FEB. 15
MARCH 1
MARCH 10
MARCH 15
APRIL 1
APRIL 15
APRIL 25
CORN,
SWEET
MARCH 30
APRIL 10
APRIL 20
MAY 1
MAY 10
MAY 20
MAY 30
CUCUMBER
APRIL 1
APRIL 10
APRIL 20
MAY 1
MAY 10
MAY 20
MAY 30
EGGPLANT,
PLANTS
APRIL 1
APRIL 10
APRIL 20
MAY 1
MAY 10
MAY 20
MAY 30
If you've already started your spring planting, I'd love to hear what you've got growing! Feel free to send pictures too! I'll include them on our Facebook Page and if you haven't already done so, join our community! It's free and you can share your gardening adventures with the rest of us..videos are welcome too!
We're having a heat wave here in east Tennessee! The temperature officially reached 62 degrees up here on English Mountain and to put it mildly, it was MARVELOUS! I threw open the windows and let all that fresh mountain air flow through the house.
Don't get me wrong, I LOVE the four seasons. One of the reasons we picked the foothills of the Tennessee Appalachians was because of the well defined, yet mild seasons we get. All that changed when we got our first major snow before Thanksgiving! NORMALLY, we get hardly ANY snow...this year, I was snowed in more than I wasn't. I did make the best of it though. I tried to enjoy every single day of the season, I had all the fire places lit, baked up a storm, quilted, painted, wrote, and spent massive amounts of time with my teens...(THANK GOODNESS IT'S ALMOST SPRING!) You'd be surprised how quick everyone, including the kids, can get sick of snow days. We're a loving family, but there is a point of too much togetherness.
Soooo with the whisper of Spring outside my window, the songs of the birds at the feeders, and the thought of getting my garden started I decided to get started on the 'Garden" section of Under the Willow Tree!
Right before I began this article I received a news alert warning me that food and gas prices were set to spiral up again...wow...what a surprise <yawn>. Who would have thunk it? That's OK, I've got a master plan for saving tons of money this year. Go grab a drink and let me share it with you! We're going to start the series with Homemade Paper Seed Pots because after all, you gotta start somewhere and your seed pots are the first step!.
Whether you are an experienced gardener or a novice like myself, you can still utilize the tips and tricks of the pro's. Each year, I go out and spend a boat load of money on planting items like peat pots, planting trays, seeds, etc. By the time I'm done buying all the equipment, I don't really save much, although I do enjoy great homegrown veggies. Most of you probably save some of the reusable stuff from the previous year but if you don't and you're starting from scratch, here is a good money saving tip for starting your seeds indoors with homemade Newspaper Seed Pots. Take a look at this wonderful video I found on You Tube.
As you can see, almost everyone has the materials for these handy-dandy little pots laying around the house. Depending on how many plants you grow your savings can start at approximately $15+. That's extra money for seeds and if you plan on preserving any of your bounty, you can use it towards preserving equipment (more on that later).
I'd love to hear how your Paper Seed Pot projects go. Be sure to email me and send me pictures and I'll use them on the UTWT community. This project may seem small and insignificant to you , but realize that you are taking your first step towards being self-sufficient AND the pots are bio-degradable, how GREEN is that! You've already eliminated the need for those plastic, mass produced pots! Good job!